QuickBooks Online (QBO) Integration:
Setup & Pushing Transactions
Overview
Cornerstone's QuickBooks Online (QBO) integration allows you to map your GL Codes and Account Types from Cornerstone's GL Table directly to your QBO Chart of Accounts — saving time and reducing manual data entry. Once mapping is complete, you can push the following directly to QBO:
- Bank deposits for payments your team posts in Cornerstone
- Bank deposits for payments Cornerstone has processed and posted in Cornerstone
- The final "month end Net Due deposit" for Cornerstone-posted payments
- After month end, a permanent cash basis journal entry to allocate deposits/payments made during the month to the correct revenue categories in QBO based on your previously configured mapping
? START HERE: Training Videos
Cornerstone has two training videos available online at alarmbills.com/training-videos/quickbooks-online-integration/ fully covering both setup and pushing transactions. This article references those videos throughout — we strongly recommend you start with them before proceeding.
Step 1 — Cornerstone to QBO Mapping
The first step is mapping the QBO Chart of Accounts to the GL Table in Cornerstone. All GL Table items must be mapped before you can push deposits to QBO.
Navigate to the GL Codes Table
- Go to Utilities > Manage Lists.
- Navigate to the Invoice tab.
- Select the GL Codes table.

The Chart of Accounts Table will display your GL Codes, Account Types, Descriptions, and the QB Account Type, QB Acct Name, and QB Account Class columns that you will fill in during mapping.

First-Time Setup: Online Setup Button
If this is the first time you are linking the Cornerstone Chart of Accounts to QBO, click the Online Setup button (bottom left) to connect to CFN and pull in the relevant CFN fields that must be mapped to QBO. See Video 1 for full details.
Activate QB Assistance
The button with the green QB icon will Activate QB Assistance, which lets you log into your QBO account. Enter your username and password as needed. You will briefly see the connection happen, then be returned to the Cornerstone Chart of Accounts to begin mapping.


Refresh Accounts
Clicking the Refresh Accounts button (bottom left) will pull in the available Chart of Accounts data from QBO. You may need to add items to the QBO Chart of Accounts to map everything showing in Cornerstone. After refreshing, click the Online Setup button to begin mapping (see Video 1).
⚠️ IMPORTANT
If you make additions to the QBO Chart of Accounts, remember to click Refresh Accounts again to access the updated QBO information before mapping.
Assigning the Mapping
Use the dropdowns in the QuickBooks Options section to select the appropriate QBO Account Type and Account Name, then assign the Account Classification. Continue editing until all Cornerstone items have been assigned to QBO items.
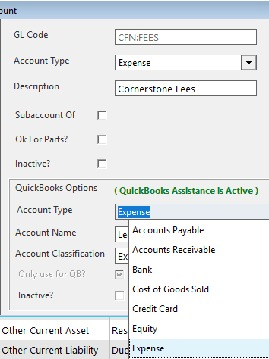

? NOTE
The Account Type and Description do not need to be the same in both Cornerstone and QBO. The ones used in Cornerstone are categorized for the Billing Detail Report. For example, receipts are treated as Income in Cornerstone but are mapped to your QuickBooks Bank Account Type to record the checking deposit.
Mapping Detail Level
Your mappings can be as detailed as you wish so that you can track revenue and expenses at a granular level. For example, a generic approach aggregates all recurring charge GL codes into a single "Recurring Services" bucket in QBO. Consult with your accountant if you have questions about which Chart of Accounts to use in QuickBooks.

The screenshot below shows how a new QBO account (such as "Recurring Services") can be added directly within the QBO Chart of Accounts:

⚠️ IMPORTANT
Once all accounts are mapped (excluding the "CFI Posting" account), you are ready to start pushing transactions. The CFI Posting account should be left blank in QBO.
Step 2 — Pushing Transactions to QBO
Accessing the QBO Dashboard
- Go to the Report Menu.
- Click the Financial tab.
- Click the Connect to QuickBooks button (right side, second from bottom).
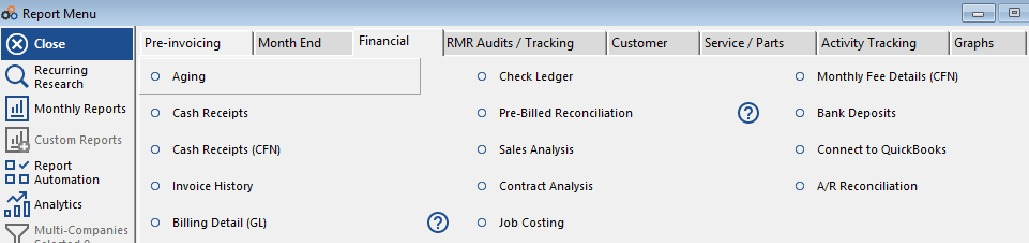
Clicking Connect to QuickBooks will open the QuickBooks Dashboard, where you will see the Journal and General tabs, filters for month/year and source, and the action buttons on the left panel.

The Two Push Buttons
On the left panel, you will see two buttons with the blue report icon:
- Bank Deposit — pushes deposits to QBO during the month.
- Billing Detail — pushes the journal entry after month end to allocate payments received to the correct revenue bucket.
Using the Filters
Filters at the top of the screen help manage the reports generated. Use these to filter for:
- Pending Only — those not yet pushed to QBO
- Month / Year
- Source — Local Postings or CFI
? WATCH VIDEO 2
Please see the second training video on the QBO Integration at alarmbills.com/training-videos/quickbooks-online-integration/ — it shows exactly how to push (a) deposits and (b) the end-of-month journal entry. There are several steps and the video walks you through all of them.
Error Checking
Error checking during Post to QuickBooks will identify errors you can troubleshoot using the General Tab. The data collected in the tab will help Cornerstone identify missing account linkages between Cornerstone and QBO.
QBO Journal Entry & Check Register Examples
Below are examples of the QBO entries created — a Journal Entry and a Check Register entry — resulting from pushing a deposit from Cornerstone.
The journal entry debits the Checking account and credits the Subscriber Pmts *Local account for the same amount, with a description referencing the deposit date range:

The corresponding Check Register entry reflects the deposit date, reference number, memo, and deposit amount:

Month End Journal Entry
As shown in Video 2, the month end Journal Entry will allocate receipts processed to the mapped income (or other) accounts. Please note that any CFN Adjustments — such as prior period payments to the dealer that have been reversed in the current period — will have their own GL code/mapping to QBO.
⚠️ MISSING GL ASSIGNMENTS
If there are line items in an invoice in Cornerstone that do not have a GL assignment, they will be captured as Missing GL Assignment. We recommend generating the Billing Detail Report in Detail mode to find the inventory items or recurring charge codes that require GL assignment to improve the data posted to QBO.
Other Accounting Systems
If you use QuickBooks Desktop or another accounting package, you can still set up the GL Table in Cornerstone and run these same reports to generate Journal Entries in CSV format. You can use these CSV files to import or copy/paste the data into your accounting system.
Exhibit — Sample Mappings Using Sandbox Account
The table below shows a sample set of mappings where the Cornerstone GL codes are mapped to sample QuickBooks Accounts. It is easy to add to the QuickBooks Chart of Accounts as needed. The CFI Posting account should be left blank in QBO (alarm-only).
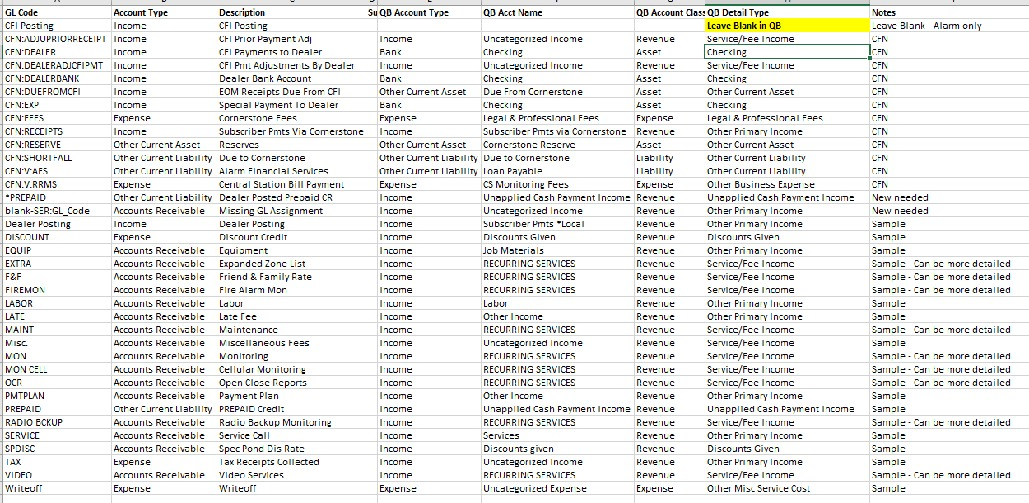
| GL Code | Account Type | Description | QB Acct Name (Sample) | QB Account Class | Notes |
|---|---|---|---|---|---|
| CFI Posting | Income | CFI Posting | Leave Blank in QB | — | Leave Blank – Alarm only |
| CFN:ADJUPRIORRECEIPT | Income | CFI Prior Payment Adj | Uncategorized Income | Revenue | CFN |
| CFN:DEALER | Income | CFI Payments to Dealer | Checking | Asset | CFN |
| CFN:DEALERRADJCFIPMT | Income | CFI Pmt Adjustments By Dealer | Uncategorized Income | Revenue | CFN |
| CFN:DEALERBANK | Income | Dealer Bank Account | Checking | Asset | CFN |
| CFN:DUEFROMCFI | Income | EOM Receipts Due From CFI | Due From Cornerstone | Asset | CFN |
| CFN:EXP | Income | Special Payment To Dealer | Checking | Asset | CFN |
| CFN:FEES | Expense | Cornerstone Fees | Legal & Professional Fees | Expense | CFN |
| CFN:RECEIPTS | Income | Subscriber Pmts Via Cornerstone | Subscriber Pmts via Cornerstone | Revenue | CFN |
| CFN:RESERVE | Other Current Asset | Reserves | Cornerstone Reserve | Asset | CFN |
| CFN:SHORTFALL | Other Current Liability | Due to Cornerstone | Due to Cornerstone | Liability | CFN |
| CFN:V:AFS | Other Current Liability | Alarm Financial Services | Loan Payable | Liability | CFN |
| CFN:V:RRMS | Expense | Central Station Bill Payment | Monitoring Fees | Expense | CFN |
| *PREPAID | Other Current Liability | Dealer Posted Prepaid CR | Unapplied Cash Payment Income | Revenue | New needed |
| blank-SER:GL_Code | Accounts Receivable | Missing GL Assignment | Uncategorized Income | Revenue | New needed |
| Dealer Posting | Income | Dealer Posting | Subscriber Pmts *Local | Revenue | Sample |
| DISCOUNT | Expense | Discount Credit | Discounts Given | Revenue | Sample |
| EQUIP | Accounts Receivable | Equipment | Job Materials | Revenue | Sample |
| EXTRA | Accounts Receivable | Expanded Zone List | RECURRING SERVICES | Revenue | Sample – Can be more detailed |
| F&F | Accounts Receivable | Friend & Family Rate | RECURRING SERVICES | Revenue | Sample – Can be more detailed |
| FIREMON | Accounts Receivable | Fire Alarm Mon | RECURRING SERVICES | Revenue | Sample – Can be more detailed |
| LABOR | Accounts Receivable | Labor | Labor | Revenue | Sample |
| LATE | Accounts Receivable | Late Fee | Other Income | Revenue | Sample |
| MAINT | Accounts Receivable | Maintenance | RECURRING SERVICES | Revenue | Sample – Can be more detailed |
| Misc. | Accounts Receivable | Miscellaneous Fees | Uncategorized Income | Revenue | Sample |
| MON | Accounts Receivable | Monitoring | RECURRING SERVICES | Revenue | Sample – Can be more detailed |
| MON CELL | Accounts Receivable | Cellular Monitoring | RECURRING SERVICES | Revenue | Sample – Can be more detailed |
| OCR | Accounts Receivable | Open Close Reports | RECURRING SERVICES | Revenue | Sample – Can be more detailed |
| PMTPLAN | Accounts Receivable | Payment Plan | Other Income | Revenue | Sample |
| PREPAID | Other Current Liability | PREPAID Credit | Unapplied Cash Payment Income | Revenue | Sample |
| RADIO BCKUP | Accounts Receivable | Radio Backup Monitoring | RECURRING SERVICES | Revenue | Sample – Can be more detailed |
| SERVICE | Accounts Receivable | Service Call | Services | Revenue | Sample |
| SPDISC | Accounts Receivable | Spec Pond Dis Rate | Discounts given | Revenue | Sample |
| TAX | Expense | Tax Receipts Collected | Uncategorized Income | Revenue | Sample |
| VIDEO | Accounts Receivable | Video Services | RECURRING SERVICES | Revenue | Sample – Can be more detailed |
| Writeoff | Expense | Writeoff | Uncategorized Expense | Expense | Sample |
Was this article helpful?
Was this article helpful?
That’s Great!
Thank you for your feedback
Sorry! We couldn't be helpful
Thank you for your feedback
Feedback sent
We appreciate your effort and will try to fix the article